

Create a simple calculator using Jotai, Tailwind CSS, and Vitest (Part 2)


Introduction Jotai
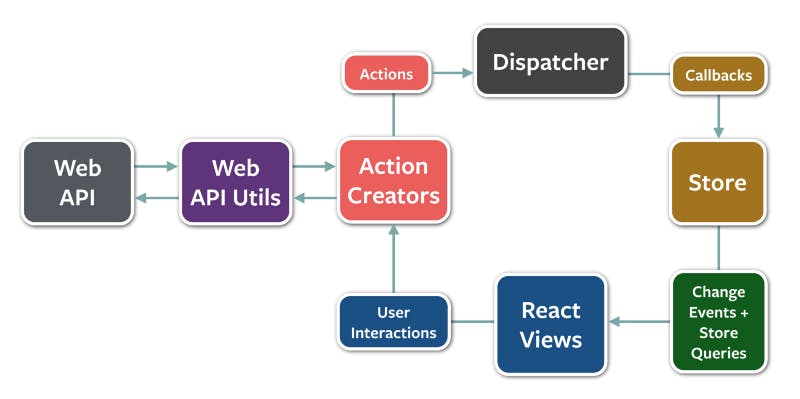
One of the essential parts of React applications is state management. There are a lot of open-source tools to make state management easier in developer experiences. Redux is considered the most popular state management for complex applications. It also implements Flux architecture, which splits the single-page application into Stores, Dispatcher, Views, and Actions. The flow can be described straightforwardly as Stores manage States and listen to changes from Actions. The View will render the user interface and handle the user interactions while the view container listens to store changes. The dispatcher broadcasts actions to registered stores. Some disadvantages can be named such as excessive memory use, increased complexity, and time-consuming boilerplate code.
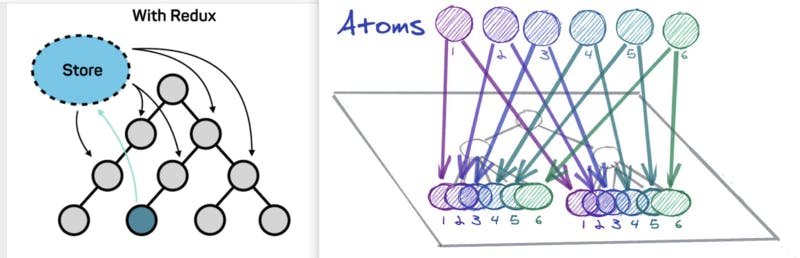
Unlike Redux, Jotai which is inspired by Recoil has a straightforward approach. The concepts of Jotai are atom (a piece of state) and useAtom (consume the state). Traditionally, a top-down solution to this is to use a selector interface. The use-context-selector library is one example. The issue with this approach is that the selector function needs to return referentially equal values to prevent re-renders, which often requires a memoization technique. On the other hand, Jotai takes a bottom-up approach which can build a state combining atoms, and optimize renders based on atom dependency. This avoids the need for memorization.
When implementing a counter, let's compare the actual code between Redux Toolkit and Jotai.
Jotai counter
// App.tsx
import type { ReactElement } from "react";
import { atom, useAtom } from "jotai";

// Stores
const calculationAtom = atom<number>(0);

// Children components
function DisplayResult(): ReactElement {
  const [value] = useAtom(calculationAtom);
  return <p>{value}</p>;
}

function AddBtn(): ReactElement {
  const [, setValue] = useAtom(calculationAtom);

  const handleClick = () => setValue((c) => (c += 1));

  return <button onClick={handleClick}>Add</button>;
}

// Parent component
export default function App(): ReactElement {
  return (
    <>
      <DisplayResult />
      <AddBtn />
    </>
  );
}
Redux toolkit counter
// Main.tsx
import { configureStore, createSlice } from "@reduxjs/toolkit";
import React from "react";
import ReactDOM from "react-dom/client";
import { Provider } from "react-redux";
import App from "./App";

// Redux slice
const slice = createSlice({
  name: "counter",
  initialState: {
    value: 0,
  },
  reducers: {
    add: (state) => {
      state.value += 1;
    },
  },
});

export const selectCount = (state) => state.counter.value;
export const { add } = slice.actions;

// Stores
const store = configureStore({
  reducer: {
    counter: slice.reducer,
  },
});

ReactDOM.createRoot(document.getElementById("root") as HTMLElement).render(
  <React.StrictMode>
    <Provider store={store}>
      <App />
    </Provider>
  </React.StrictMode>
);
// App.tsx
import { ReactElement } from "react";
import { useDispatch, useSelector } from "react-redux";
import { add, selectCount } from "./main"

function App(): ReactElement {
  const count = useSelector(selectCount);
  const dispatch = useDispatch();

  return (
    <div>
      <p>Counter value: {count}</p>
      <button onClick={() => dispatch(add())}>Add</button>
    </div>
  );
}

export default App;
As the implementation, Jotai's basic syntax is similar to React useState. useAtom returns an array of size 2, where the 1st element is a value and the 2nd element is a function, to set the value of the atom. This makes all the components rely on this atom update and re-render.
Implementing frontend
The goal of my simple calculator is a calculator that can do basic operations such as addition (+), minus (-), multiply (*), and divide (/). It can save the history of previous calculations in the local storage. The application has a light and dark theme.
You may find the whole project here: GitHub

I use atom in the demo to manage the theme, calculation history, user inputs, and error messages. Each of them will be consumed in each respective component.
import { atom } from "jotai";
import { atomWithStorage } from "jotai/utils";
import { HISTORY } from "../interfaces";

// Theme
export const themeAtom = atomWithStorage<string>("color-theme", "light");
export const isLightThemeAtom = atom((get) => get(themeAtom) === "light");

// History of caculation
export const historyAtom = atomWithStorage<HISTORY[]>("his-cal", []);

// Current inputted math formula
export const inputAtom = atom<string>("");

// Current inputted math formula that clear one charater on the end
export const previousInputAtom = atom((get) => {
  const i = get(inputAtom).slice(0, -1);
  return i ? i : "";
});

export const errorAtom = atom<string>("");
atomWithStorage s a utility function that allows you to create an atom with persistent storage. It takes two arguments: a key and a default value. The get function is used to read the current value of an atom by passing the atom as an argument to the get function.
Hope that you enjoy the article. Thank you for reading.
References
[1] imaginarycloud.com/blog/recoil-vs-redux
[2] blog.boardinfinity.com/working-with-redux-p..
[3] freecodecamp.org/news/an-introduction-to-th..